Showing posts with label MAC. Show all posts

Monday, 11 April 2011

April Mini Haul + Swatches

So today I have a few new products to share with you that I'm totally excited about!!


I got two new MAC powder blushes in the mail, they were a great bargain on eBay, I think they were €13 each! I had to wait almost one month to receive them because they shipped from the UK with standard airmail, but hey, that's a small price to pay for these lovely babies!!

Also, I stopped by KIKO this morning and finally gave in and purchased one of the Colour Sphere Eyeshadows that I had been eyeing for a while. Yesterday I watched a great tutorial that featured MAC Pigment in Gold Mode which looked lovely. Sadly, it was LE so I thought that it would be cool to find a dupe somewhere. So, earlier this morning I randomly swatched this baked shadow in the shop and it seems to be a close dupe for Gold Mode (please correct me if I'm wrong)!!! Talk about killing two birds with one stone. The Colour Sphere Eyeshadows are €5,90 each.


Pix:
Left to right, clockwise: KIKO Colour Sphere n.3, MAC Margin, MAC Mineralize Dainty
Left to right: Kiko n. 3, MAC Margin, MAC Dainty
MAC Margin is part of the permanent collection. It's a frosty bronze colour with hints of pink and brown. I'm sure it would suit most complexions and I can really see this working for an everyday sunkissed glow. It's also very pigmented and you get 6 grams of product, which takes forever to hit pan on. 

I'm already in love with MAC Mineralize Blush in Dainty! It has everything I was looking for in a coral blush for spring: it's a pinkish coral with a soft velvety finish and and almost invisible golden sheen to it. It's quite sheer, in fact I had to swatch it several times to get the colour you can see in the picture below, which means that it can be layered for a bold pop of colour or just applied with a light sweep for those who shy away from statement cheeks. 


KIKO Colour Sphere Eyeshadow n.3 is a gorgeous, gorgeous soft warm gold that is not too yellow not too green, but rather leans towards rosy tones. In the picture below I swatched it dry and wet. When you keep it dry it really shows a lot of glitter, which might lead to heavy fallout (will update when I review it), so probably the best use for it would be wet, and as you can see the colour comes out much more vibrant and opaque.
Left to right: Margin, Dainty, Colour Sphere n.3 dry and wet
Margin and Dainty
Colour Sphere n.3 dry and wet


I can't wait to try these!! I will probably post a review in a few weeks because I really want to give them an appropriate amount of testing time.


Have you tried these products yet? Leave a comment!

Friday, 8 April 2011

Eyebrow pencils comparison (Lancome, Essence, MAC, Rimmel)

I have tried a few products for eyebrows in the last 6/7 months, and among these are eyebrow pencils. I have pretty decent brows that only need some filling here and there, but pencils are a great tool for those who need to draw and reshape their brows as well. I am going to compare the ones I currently have and rank them from favourite to least favourite. 

NOTES: *I'm giving the prices in UK pounds for convenience. **Keep in mind that I have blonde hair, so my review of the products is also based on their ability to match my natural hairs, so if you are a brunette/Asian/WOC you might want to adapt my criteria to your colouring. 

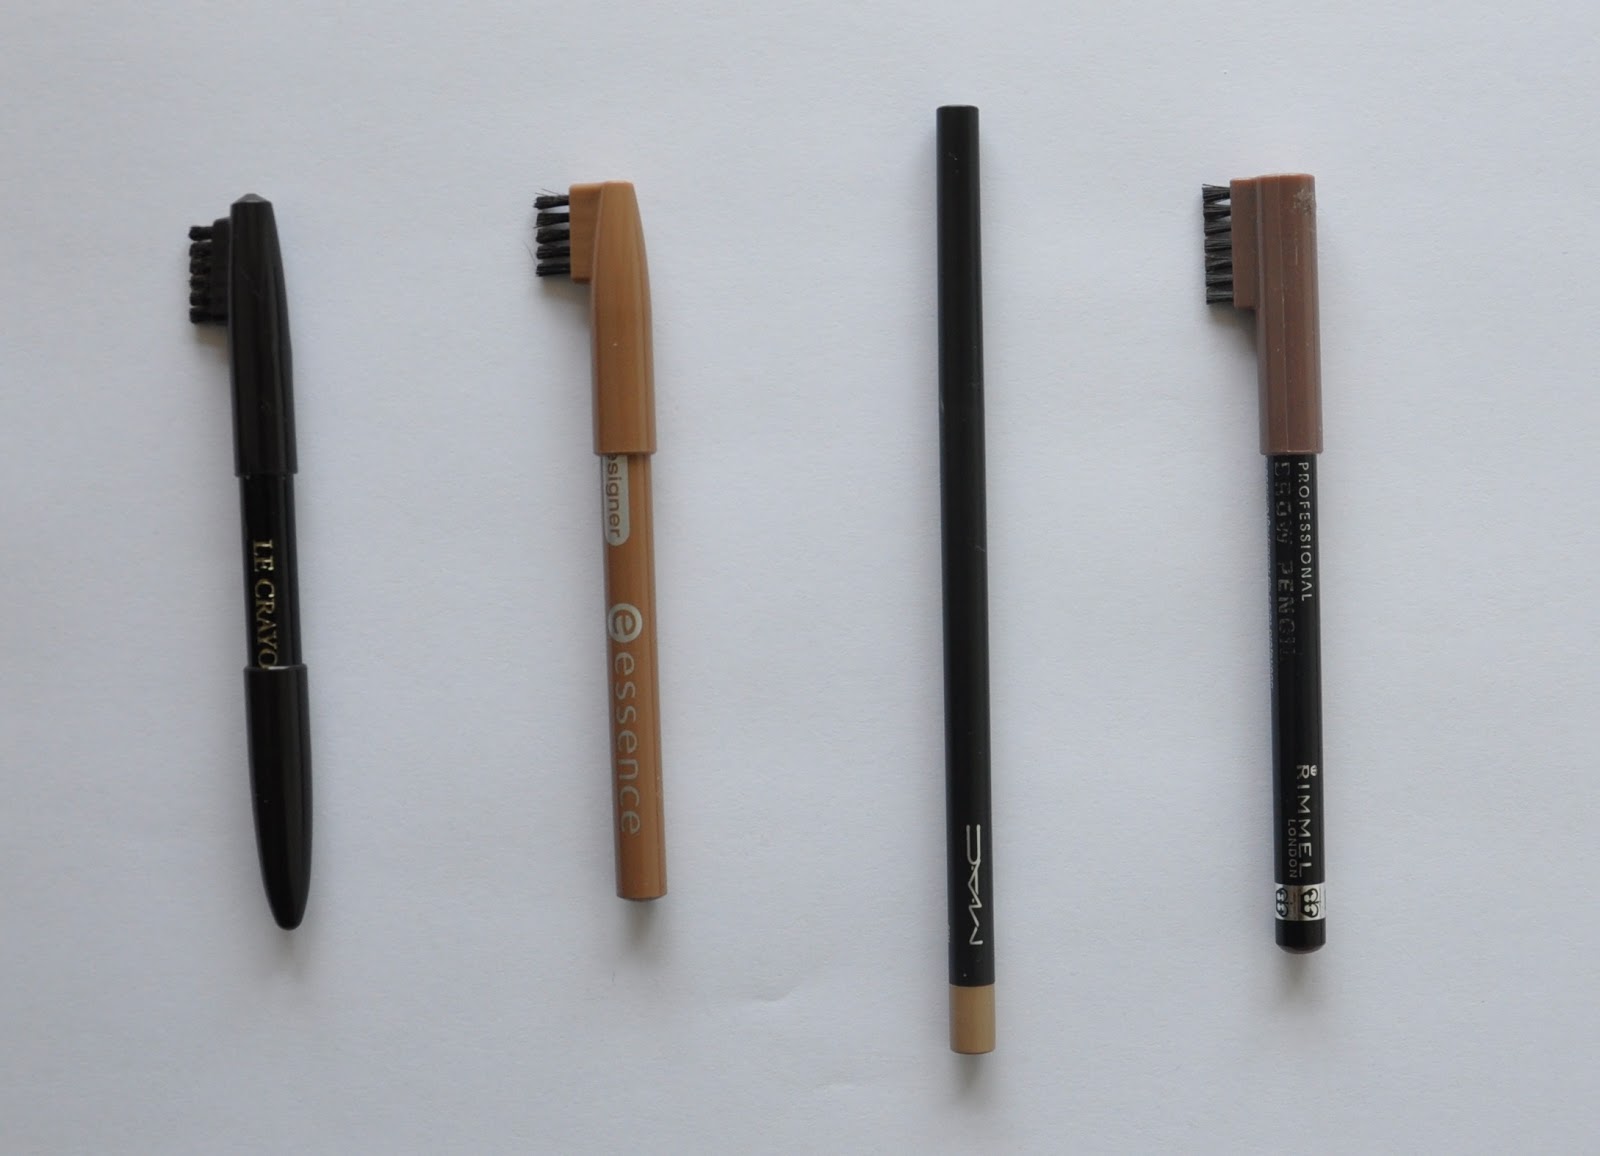
Left to right: Lancome Le Crayon Sourcils Pro, Essence Eyebrow Designer, MAC Eyebrows and Rimmel Professional Eyebrow Pencil


Lancome Le Crayon Sourcils Pro: this is the most expensive of the bunch, at £14.80 and also the first one I purchased, as you can see from the picture above. 01 Blonde is a light warm brown that doesn't match my brows heavenly. It has strong reddish undertones that show up when I apply it with a heavy hand. However, if I am only filling lightly it will be OK. Another con of this pencil is that it is packaged with a clear wax tip on the other end, which I find completely uselesss (it didn't keep my brows in shape at all, it just felt too waxy and messed with the colour on top). Also, it is hard to apply! I have to press quite hard to get the colour to show up, so it can actually end up irritating my skin around the area. Not. Cool. The pros: it lasts, and the tiny brush on the cap works well to blend the colour with a natural finish.

Essence Eyebrow Designer in 03 Light Brown: this is incredible value for money! Essence is a German drugstore brand with really unbelievable prices. I bought it when I had the chance to visit a dear friend in Bonn and it cost me the equivalent of £0.90! I was a bit sceptical but I figured that, for the price, I might as well take the risk. As you can see from the swatches below, the colour is still on the brownish side, but it has more yellow than red in it. The finish is much more natural than the Lancome one! It is long lasting and easy to work with, very soft. If you're broke but really need an eyebrow pencil, I would recommend this one. 

MAC Eyebrows in Fling: this is an automatic pencil, meaning that you don't waste any product by sharpening it (and it also lasts longer than regular pencils!). The colour is a gorgeous light greyish taupe which reminds me of MAC eyeshadow in Omega: that would most likely work as a brow filler too. Because it has no hint of yellow or red in it, it's the one that looks most natural of all the four pencils! It is the ultimate ashy taupe shade which is exactly what blonde brows need! Seriously, nothing can beat the colour of this one. The consistency is creamy but it stays put. It's £11.50, in line with MAC products!


Left to right: Lancome, Essence, MAC, Rimmel


Rimmel Professional Eyebrow Pencil in Hazel: I am on the fence about this one. It is a great eyebrow pencil, but the colour is WAY to dark for me, and also pretty reddish. What really bummed me is the poor colour selection: it is only available in two shades, of which one is intended for black-haired gals, and the other (the one I have) would definitely suit most brunettes, but in no way it gets close to my natural brow colour. I might still use it when I do other people's make-up, because it DOES work well, but Rimmel should really work on the shade range. If it matches you, it's great bargain at £2.99!

Final thoughts: the two pencils I would most definitely not repurchase are the Lancome and the Rimmel one; the former because of the steep price that does not equal quality, the latter because of the bad colour match. Essence is still a good choice, but the most flawless and natural result was achieved by the MAC one! 

So this is my final ranking!
1. MAC
2. Essence
3. Rimmel
4. Lancome

What's your favourite brow pencil?
And what pencil would you never recommend to anyone?
Feel free to leave a comment!

Tuesday, 22 March 2011

Mac Lip Pencil in Subculture - Review, Photo, Swatches

Mac Lip Pencil in Subculture is a great pick if you, like me, are new to lip pencils. I've had this one for quite some time now, I got it at one of London's airports when I bought my first MAC lipstick, and the SA matched me to this colour for a naturally defined lip.

It comes in the classic MAC sleek black packaging and the price was in line with the other MAC products, although I got it for less (I think around £10) at the duty-free shop. This is how it looks like:

The colour is a pretty rosey brown with a slight peachy undertone that looks great on fair to light-medium complexions and lips with average natural pigmentation. You won't be able to see this if you're darker than NC/NW25, I guess. It's basically the same colour of my lips, so it works great to give that tiny little bit of definition that makes a difference, even if I'm only wearing lipbalm. Texture is creamy, but not excessively moist, so the staying power is really good. 
Here comes the swatch:


Here I'm suggesting 3 possible ways to wear Subculture for an everyday look:


1) Line your lips with Subculture, smudge the line towards the inside of the lip, then follow with lipbalm or clear lipgloss for a no-makeup look.

2) Line and fill in your lips with Subculture, which will give a light hint of colour and apply lipbalm or clear lipgloss over it. It will look like the most natural nude lipstick ever!

3) The slightly more polished version of this is achieved by wearing Subculture all over the lips as a base for a neutral lipstick. It will definitely help the lipstick stay on longer and it will make the colour look saturate. This is a great solution when you're sporting an intense smokey eye.


As a general rule, layering an appropriate amount of a matching lipliner will help your lipstick last longer and prevent it from bleeding and fading!

Wednesday, 23 February 2011

How to wear MAC eyeshadow in Fig.1

I recently purchased MAC eyeshadow in Fig. 1 to fit in my 4-pan palette along with Woodwinked and Mythology. 

Fig. 1 is a great versatile colour that would work on a variety of skintones and eye colours! MAC describes it as "eggplant purple" and I would say it's pretty accurate. It's definitely on the warmer side of purples. It belongs to the group of shadows called "Matte²", which are richly pigmented and obviously have a matte finish. Compared to the regular MAC matte eyeshadows, these are superior in quality and blendability, and generally have more vibrant colours. Forget dull, flat matte shades.


Here I'm suggesting three possible combinations to wear it.
Eyeshadows swatched on my NW15 arm, over E.L.F. Mineral Eyeshadow Primer.


The first combo would be great for a soft, warm, everyday look. Fig.1 goes in the crease to give dimension, while on the lid I put a rosy-golden shade, possibly with some shimmer/metallic finish to contrast the other one. In this swatch I used Laura Mercier Metallic Creme Eyeshadow in Rose Gold, which has a really beautiful rosy base with a golden duochrome effect. It's a cream eyeshadow but it lasts throughout the day.
Left: Laura Mercier Metallic Creme Eyeshadow, Right: MAC Fig. 1


Left: NYX grey eyeshadow, Right: MAC Fig.1
The second option would be to wear a shimmery, light grey/silver shade on the lid, and Fig. 1 again in the crease. In this combo the pop is given by the contrast between a very cool colour (grey) with the warmth and softness of Fig.1. In this picture I used an eyeshadow from NYX Caribbean Palette in I Dream Of Saint John, namely the second shade from the left. Another option would be to use an even bolder lid shade, such as a metallic cream silver shadow like Make Up For Ever Aqua Cream #3, which looks like foil once applied and won't crease or smudge.
This colour pairing reminds me of the new NARS Eyeshadow Duo in Melusine, which you can see here.

Finally, Fig. 1 could be used on the lid for a bold, nighttime look, with a deep black in the crease. For this swatch I used KIKO Long Lasting Stick Eyeshadow n.20, a creamy true black, which is a great alternative to MAC Shadesticks (basically the same type of product for a fraction of the price). For added drama, apply some golden glitter over Fig.1 (KIKO Electric Lights Loose Pearl no.03), to achieve a sort of duochrome effect. This combo would make for a perfect classy, sexy smokey eye.

I hope this was useful! Feel free to leave a comment!

Monday, 21 February 2011

Warm eyeshadow for blue eyes: copper tutorial

Here we go with warm eyeshadow for blue eyes, second take! 

This time I used three different colours in the range of reds and coppers plus one highlighting shade. If you have blue eyes, bear in mind that copper, gold, orange and red will make them pop and stand out more than any other shade. 


How did I achieve this look? 

1. I combed and filled in my eyebrows with E.L.F. Brow Kit in Ash using a small angled brush.

2. I primed my entire eye area with Too Faced Shadow Insurance. Make sure you are using a silicon-based primer because it will keep your eyeshadow from creasing and smudging. 

3. I applied Urban Decay eyeshadow in Half Baked all over my lid. This is a gorgeous yellow gold that goes on like butter. I used a large shading brush to get an even application and lightly blended out the edges.

4. As the second darkest shade I chose MAC eyeshadow in Mythology, a classic orangey colour for blue-eyed ladies. I packed the colour on a tapered brush and tapped off the excess to prevent fallout. Then I put the colour in my crease in layers to achieve contrast with the golden shade on the lid. Then again, blended the edges with the same brush.

5. I picked up MAC Pigment in Vanilla to use as a highlighter on my browbone and inner corners of my eyes, using a fluffy angled brush with natural bristles. I made sure I blended the highlighter with the other colours to make harsh edges disappear.

6. With the same small tapered brush I applied the darkest shade, KIKO Highly-Pigmented Eyeshadow n. 30, in the outer corner of my eyes, forming a V-shape, and on the lower lashline for about two thirds of its length. This colour can be described as a deep, pearly, burgundy. In this tutorial I mostly used shimmery eyeshadows but you can play up with textures as well by using a mix of matte, satiny, and shimmery eyeshadows, it's really up to you. 

7. I finished off with a defined black eyeliner (L'Oreal Lineur Intense), winging it out a little bit, and three generous coats of mascara (Rimmel Extra Super Lash). On my lower lash line I also applied some black pencil liner (Estee Lauder Double Wear Eyeliner in Onyx) with a light hand and smudged it out with its own sponge applicator.


This makes for a pretty bold eye, so if you need something more wearable during office hours, I would recommend using the two medium shades only, that is the yellowish gold on the lid and the orangey shade in the crease. You want to use some black liner and mascara anyways, otherwise you might look like you just got punched in the eyes, and that's not quite the purpose of this make-up. As I said in my previous post, make sure you use black or cool-toned eyeshadow in between the reddish shades and your eyes, to tone down the redness and make the most out of this contrast.

Do you like this look? Have you tried it yet? Tell me in the comments!

Friday, 18 February 2011

Warm eyeshadow for blue eyes: combo and tutorial

Until a while ago I was unhappily convinced that only cool colours would look good on girls with blue eyes, fair skin and blonde hair (read: me). Thanks to YouTube and some beauty bloggers I learnt that the best colour combinations for blue eyes often include many, many warm colours. In fact, if you haven't, you should have a look at the classic colour wheel that you can find here.

Colour theory is really very important when choosing which eyeshadows you want to apply when doing your make-up. The goal would be to make your eyes pop, and that is achieved by using the shades that are opposite to your eye colour on the wheel. In my case, blue is directly opposite to oranges, yellows and reds. What?! Orange eyeshadow on my eyelids?!

Yes sir. There are a few tricks to bear in mind when picking these shades, but by using them carefully you can achieve a really stunning gaze. Here's what I'm talking about:
(excuse the poor photography)


How did I achieve this look?
1. I filled my eyebrows with E.L.F. Brow Kit in Ash and primed the entire eye area with Urban Decay Primer Potion, from the inner corner of the eyes up to the browbone. Always remember to apply your primer in every area you are planning to apply eyeshadow. 

2. To highlight I used a small amount of MAC Cream Colour Base in Luna and gently patted it along the browbone and tearduct area. 

3. On my eyelid I packed on MAC Woodwinked, a gorgeous, shimmery, slightly dirty gold.

4. Applied MAC Deep Truth in the crease and outer corner of my eye. Deep Truth is a deep blue with an uber metallic finish, which in this picture does not quite show up.

5. I blended the two colours together, then lined my eyes with black liquid eyeliner (L'Oreal Lineur Intense) and finished off with three coats of black mascara (Max Factor 2000 Calorie).

One of the keys to make warm eyeshadows work with blue eyes, IMHO, is to put them in contrast with cooler shades (e.g. blue, purple, etc.) and/or a deep black eyeliner. This way your complexion too won't look too washed off if you're very pale like me.

The next post will be about another great warm eyeshadow combo for blue eyes... Keep reading!