Friday, 29 April 2011

April Photo Shoot #2

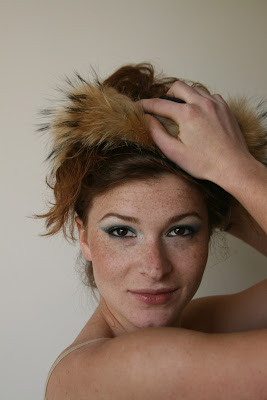
This is the second job I've done this month with my friend Rob, who was in charge of taking the pictures. He is a pretty damn good photographer! You can check out more of his works here

Model: Viola
On a technical level, the make-up was a bit of a challenge given the fiery colours of this red-headed beauty. 


I wanted to keep face make-up at a minimum to let the natural pigmentation given by the freckles glow on its own. Therefore I used a camera-friendly primer (MUFE HD Primer n.5) and MAC Face&Body Foundation in N1, which turned out perfect thanks to its sheerness and "real skin" finish. 


Then I added a touch of Estee Lauder Bronze Goddess Soft Matte Bronzer to lightly contour her face and give a subtle sunkissed glow, and dabbed the tiniest bit of MAC Cream Colour Base in Luna along her cheekbones. At that point her face make-up really looked like it didn't need any more colour, so I skipped the blush, which I usually never do! The powder I used is E.L.F. HD Powder. 


I thought it would be fun to create a contrasting pop of colour on her eyes. After priming her eyelids with Too Faced Shadow Insurance and applying a white base (Topshop Khol), I chose Boots N.7 Stay Perfect Eyeshadow in Peacock as a main lid colour. To give it more dimension, I added Urban Decay Half Baked on the centre of the lid and used MAC Steamy as a transition shade. The eyeshadow was completed with a frosty cream shade from the NYX Caribbean Palette in I Dream of St. John on the browbone. 

I tightlined her waterline with MAC Fluidline in Blacktrack, added Estee Lauder Sumptuous Extreme Mascara and Ardell Accent False Lashes n. 308 for a flirty edge.  
Here's a detail of the eyes:


On the eyebrows: Urban Decay Buck and KIKO Brow Designer to keep them in place. Her lips only needed a bit of definition and glossiness, which I achieved with MAC Lip Liner in Subculture and Bourjois 3D Effect Lip Gloss n.42 layered over it. 


I hope you enjoyed it. I must admit it wasn't the easiest job ever, so I would be really happy to hear your opinions on this make-up and I'm definitely open to criticism! 

There will also be more photo shoot posts to come!

NYX Mega Shine Lip Gloss Review and Swatches!

I've been loving these glosses from NYX recently! 

They come in a HUGE selection of shades (as much as 50 to choose from!!) and they are very affordable. They retail for $5.50 in the US, but they aren't nearly as inexpensive if you order from the UK site (£5.95, boo!). However, you can find some pretty neat deals on eBay, there is a bunch of online sellers who have amazing wholesale offers. 

Now, I'm not a huge sucker for glosses, but these ones really won me over. Why? 
Because:
- they are NOT sticky (which usually is an issue with lipglosses)
- they have decent lasting power
- they are generally very opaque (no sheer washes of colour here!)
- they have cute and functional packaging 
- again, the crazy colour range, with some pretty unique shades


There is a minor downfall to these ones, which is the smell. They smell like cheap plastic make-up, almost strawberry-ish. If you can bear a weird smell (it fades away though), then I would totally recommend these!


So, I've got four shades, which you can see in the swatches below:
Left to right: Clear, Beige Pearl, Plush Red, African Queen


Clear is just a plain clear gloss that looks lovely when dabbed on top of a smokey eye - glamour check. 
Beige Pearl is a shimmery warm champagne.
Plush Red is a bright cool-toned red (reminds me of MAC Russian Red lipstick?).
In my opinion the real star here is African Queen! It's quite difficult to describe, but let me try: a warm fuchsia with a blue/violet duochrome to it. This is VERY opaque and looks like vynil on the lips. I believe this would look absolutely gorgeous on women of colour (which the name in fact suggests). 


I also swatched these on my lips to show you how they actually translate (top to bottom: Clear, Beige Pearl, Plush Red, African Queen), but bear in mind that the last two colours are much brighter in person. Swatches were taken on moisturized lips, with neither lip liner nor lipstick on, so I am aware that the application does not look flawless, sorry about that.


(Please excuse the gross pimple at the side of my mouth, bad skin day).

Have you tried these NYX glosses? Which other shade would you recommend? Say it in the comments!

Tuesday, 26 April 2011

April Photo Shoot #1

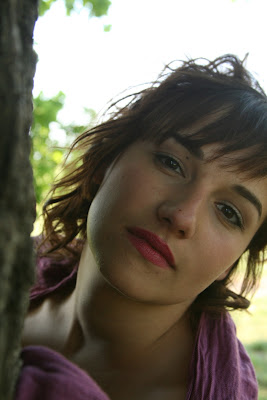
Last week I was asked by my friend Rob to assist him during a photo shoot he had scheduled with a couple of lovely girls, Lana and Marta. I did their make-up, which took 3 hours and was pretty exhausting, but we all had good fun! 

We decided to play up with the girls' features a bit and create some sort of asymmetry by making Lana's lips and Marta's eyes stand out, while still maintaining a diffused, naturally sunlit look. 


Here's what I used on Lana:
 

(face)
MAC Face and Body Foundation in C3
KIKO Natural Concealer n. 02
E.L.F. HD Powder
MAC Blush in Melba
Estee Lauder Bronze Goddess Soft Matte Bronzer
MAC Cream Color Base in Luna (highlight)

(eyes)
Too Faced Shadow Insurance
MAC Paint Pot in Soft Ochre
KIKO Eyeshadow n. 120 (brows)
KIKO Brow Designer
Urban Decay Eyeshadow in Virgin (lid)
Urban Decay Eyeshadow in Buck (socket)
MAC Eyeshadow in Blanc Type (highlight)
Urban Decay 24/7 Liner in Zero
Estee Lauder Sumptuous Extreme Mascara

(lips)
A Natural Difference lipbalm
MAC Lip Liner in Subculture
MAC Lipstick in Lickable
Cargo Reverse Lipliner in Light/Medium

On Marta I used:

(face) 
MAC Face and Body Foundation in N1 and Make-up For Ever HD Foundation n. 117 mixed
Clinique Line Smoothing Concealer
Make-up For Ever Full Cover Concealer n. 3
E.L.F. HD Powder
MAC Blush in Melba
Estee Lauder Bronze Goddess Soft Matte Bronzer
MAC Cream Colour Base in Luna (highlight)

(eyes) 
MAC Eye Brows in Fling 
KIKO Brow Designer
Too Faced Shadow Insurance 
MAC Paint Pot in Rubenesque 
MAC Eyeshadow in Patina (lid)
Make-up For Ever Diamond Shadow n. 311 (socket)
MAC Fluidline in Blacktrack 
NYX Caribbean Palette in I Dream of St. John
Estee Lauder Sumptuous Extreme Mascara

(lips) 
A Natural Difference lipbalm
MAC Lip Liner in Subculture
MAC Lipstick in Patisserie 

I prepped both girls with Caudalie toner, Embryolisse moisturizer and Make-up For Ever HD Primer n. 5. 

Here's two more haunting takes:


 You can view more pics from the photo shoot, as well as Rob's portfolio, here!


(All rights reserved)

Monday, 11 April 2011

Gold eyeshadow craze!

Today's mini haul inspired me to write a post about gold eyeshadow


It's being my favourite eyeshadow colour at the moment, it's incredibly versatile and makes for a great daytime neutral with an edge. 


These are the golds I currently own:

Left to right: E.L.F. Mineral Eyeshadow in Caffeinated, MAC Rubenesque Paint Pot, MAC Liquidlast Liner in Molten Sol, Urban Decay Half Baked, MAC Patina, MAC Woodwinked, Kiko Colour Sphere Eyeshadow n. 3, Bobbi Brown Metallic Long-Wear Cream Shadow in Antique Gold

  • Caffeinated is an intense dark gold, leaning towards brown. It is very shimmery with loads of glitter too.


  • Rubenesque is a cream eyeshadow that can be worn alone or as a base. It's a pink-gold duochrome, very flattering on blue/green eyes even on itself.


  • Molten Sol is an amber gold liquid eyeliner. I don't find myself reaching for this one so often because it really is a pain to take off, even with an oil-based cleanser. I don't like being forced to choose between removing my make-up or reading a good book at night. Apart from that, it's a great eyeliner. 


  • Half Baked came in the Naked Palette, it is a true yellow gold with a shimmery finish and no glitter. I like this a lot but it's very yellow so you need to find specific pairings for this one. 


  • Patina is arguably one of my favourite MAC eyeshadows. It is a muted taupe-gold with almost undetectable pinkish reflects. It's an awesome lid colour for neutral eyes and great paired with brights too. 


  • Woodwinked is described by MAC as "warm antique gold" and that would be pretty accurate if you looked at the colour in the pan. Unfortunately it doesn't transfer quite like that on my lids: instead, it turns into a bright goldy orange, almost like Mythology. I still like it in the crease with Patina on lids, for example. 


  • Colour Sphere n.3 looks almost the same as Half Baked in the picture above, but it's actually much more on the rosy side, while Half Baked is definitely yellow. 


  • Antique Gold is not exactly gold per se, but rather a taupy grey base with loads of golden shimmer in it. The shimmer is very soft and the overall finish is indeed Metallic as the name suggests. This one is really one of a kind.


  • The ones I love more are the duochromes, they are definitely more vibrant and versatile than the regular flat golds.

    How do you guys like to wear your golds?

    April Mini Haul + Swatches

    So today I have a few new products to share with you that I'm totally excited about!!


    I got two new MAC powder blushes in the mail, they were a great bargain on eBay, I think they were €13 each! I had to wait almost one month to receive them because they shipped from the UK with standard airmail, but hey, that's a small price to pay for these lovely babies!!

    Also, I stopped by KIKO this morning and finally gave in and purchased one of the Colour Sphere Eyeshadows that I had been eyeing for a while. Yesterday I watched a great tutorial that featured MAC Pigment in Gold Mode which looked lovely. Sadly, it was LE so I thought that it would be cool to find a dupe somewhere. So, earlier this morning I randomly swatched this baked shadow in the shop and it seems to be a close dupe for Gold Mode (please correct me if I'm wrong)!!! Talk about killing two birds with one stone. The Colour Sphere Eyeshadows are €5,90 each.


    Pix:
    Left to right, clockwise: KIKO Colour Sphere n.3, MAC Margin, MAC Mineralize Dainty
    Left to right: Kiko n. 3, MAC Margin, MAC Dainty
    MAC Margin is part of the permanent collection. It's a frosty bronze colour with hints of pink and brown. I'm sure it would suit most complexions and I can really see this working for an everyday sunkissed glow. It's also very pigmented and you get 6 grams of product, which takes forever to hit pan on. 

    I'm already in love with MAC Mineralize Blush in Dainty! It has everything I was looking for in a coral blush for spring: it's a pinkish coral with a soft velvety finish and and almost invisible golden sheen to it. It's quite sheer, in fact I had to swatch it several times to get the colour you can see in the picture below, which means that it can be layered for a bold pop of colour or just applied with a light sweep for those who shy away from statement cheeks. 


    KIKO Colour Sphere Eyeshadow n.3 is a gorgeous, gorgeous soft warm gold that is not too yellow not too green, but rather leans towards rosy tones. In the picture below I swatched it dry and wet. When you keep it dry it really shows a lot of glitter, which might lead to heavy fallout (will update when I review it), so probably the best use for it would be wet, and as you can see the colour comes out much more vibrant and opaque.
    Left to right: Margin, Dainty, Colour Sphere n.3 dry and wet
    Margin and Dainty
    Colour Sphere n.3 dry and wet


    I can't wait to try these!! I will probably post a review in a few weeks because I really want to give them an appropriate amount of testing time.


    Have you tried these products yet? Leave a comment!

    Friday, 8 April 2011

    Eyebrow pencils comparison (Lancome, Essence, MAC, Rimmel)

    I have tried a few products for eyebrows in the last 6/7 months, and among these are eyebrow pencils. I have pretty decent brows that only need some filling here and there, but pencils are a great tool for those who need to draw and reshape their brows as well. I am going to compare the ones I currently have and rank them from favourite to least favourite. 

    NOTES: *I'm giving the prices in UK pounds for convenience. **Keep in mind that I have blonde hair, so my review of the products is also based on their ability to match my natural hairs, so if you are a brunette/Asian/WOC you might want to adapt my criteria to your colouring. 

    Left to right: Lancome Le Crayon Sourcils Pro, Essence Eyebrow Designer, MAC Eyebrows and Rimmel Professional Eyebrow Pencil


    Lancome Le Crayon Sourcils Pro: this is the most expensive of the bunch, at £14.80 and also the first one I purchased, as you can see from the picture above. 01 Blonde is a light warm brown that doesn't match my brows heavenly. It has strong reddish undertones that show up when I apply it with a heavy hand. However, if I am only filling lightly it will be OK. Another con of this pencil is that it is packaged with a clear wax tip on the other end, which I find completely uselesss (it didn't keep my brows in shape at all, it just felt too waxy and messed with the colour on top). Also, it is hard to apply! I have to press quite hard to get the colour to show up, so it can actually end up irritating my skin around the area. Not. Cool. The pros: it lasts, and the tiny brush on the cap works well to blend the colour with a natural finish.

    Essence Eyebrow Designer in 03 Light Brown: this is incredible value for money! Essence is a German drugstore brand with really unbelievable prices. I bought it when I had the chance to visit a dear friend in Bonn and it cost me the equivalent of £0.90! I was a bit sceptical but I figured that, for the price, I might as well take the risk. As you can see from the swatches below, the colour is still on the brownish side, but it has more yellow than red in it. The finish is much more natural than the Lancome one! It is long lasting and easy to work with, very soft. If you're broke but really need an eyebrow pencil, I would recommend this one. 

    MAC Eyebrows in Fling: this is an automatic pencil, meaning that you don't waste any product by sharpening it (and it also lasts longer than regular pencils!). The colour is a gorgeous light greyish taupe which reminds me of MAC eyeshadow in Omega: that would most likely work as a brow filler too. Because it has no hint of yellow or red in it, it's the one that looks most natural of all the four pencils! It is the ultimate ashy taupe shade which is exactly what blonde brows need! Seriously, nothing can beat the colour of this one. The consistency is creamy but it stays put. It's £11.50, in line with MAC products!


    Left to right: Lancome, Essence, MAC, Rimmel


    Rimmel Professional Eyebrow Pencil in Hazel: I am on the fence about this one. It is a great eyebrow pencil, but the colour is WAY to dark for me, and also pretty reddish. What really bummed me is the poor colour selection: it is only available in two shades, of which one is intended for black-haired gals, and the other (the one I have) would definitely suit most brunettes, but in no way it gets close to my natural brow colour. I might still use it when I do other people's make-up, because it DOES work well, but Rimmel should really work on the shade range. If it matches you, it's great bargain at £2.99!

    Final thoughts: the two pencils I would most definitely not repurchase are the Lancome and the Rimmel one; the former because of the steep price that does not equal quality, the latter because of the bad colour match. Essence is still a good choice, but the most flawless and natural result was achieved by the MAC one! 

    So this is my final ranking!
    1. MAC
    2. Essence
    3. Rimmel
    4. Lancome

    What's your favourite brow pencil?
    And what pencil would you never recommend to anyone?
    Feel free to leave a comment!